I've
attempted on more than one occasion to explain how I go about drawing Celtic
knots, but finding it quite impossible to describe with words alone, I finally
decided to put together this small tutorial with visual aid.
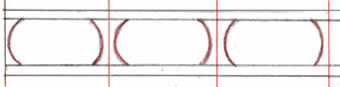
Most tutorials on drawing knots will emphasize use of a precise grid, but personally
I don't feel that's always necessary. I start out by lightly sketching some
guidelines for myself--as seen in the image above marked in red. I first divide
my space into equal segments with vertical lines. Then I choose a basic shape
for the knot segments and draw those in lightly as well. Here I'm using an oval
shape, but any repeating shape (such as circles or rectangles), or repeating
patterns of shapes (oval,rectangle, oval, rectangle, etc.) can be used.
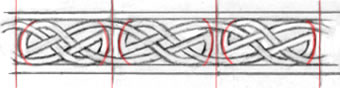
Using
the guidelines I just drew as boundaries for the general shape of the knot,
I work out a pattern that fits within the shape. In this case, I'm using a relatively
simple, symmetric 'S' shaped pattern. Asymmetrical patterns that alternate either
horizontally or vertically are common as well.
The
third step is the tedious part. Here, I draw in the double lines, adding in
the portions of the lines that connect one knot to the next using the pattern
lines I drew in step 2. Be sure to alternate in an over-under pattern wherever
the lines intersect.
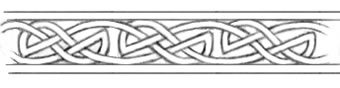
In the final step, I erase the guidelines (which may be unnecessary if you plan
to digitally color your knots--you can simply paint over the guidelines) and
I'm left with a nice, clean looking, evenly spaced knot.
1.
2.
3.
4.